Posts Tagged ‘hands-on science’

Warming Things Up with Friction

Monday, September 26th, 2016

warming-things-up-with-friction

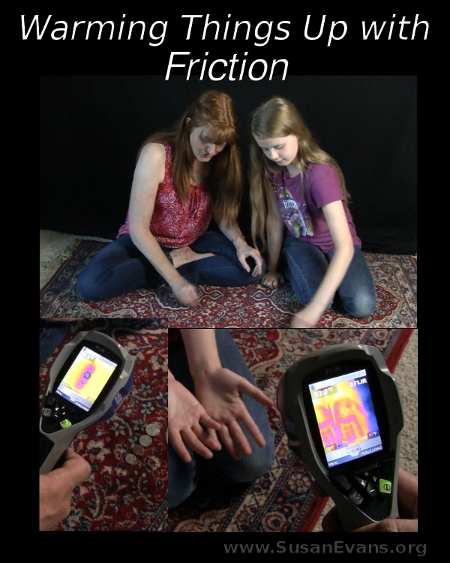
Today we will be warming things up with friction. We will be rubbing coins against the carpet to see if they get hot. We will be using an infrared camera to see how hot the coin gets after experiencing friction.

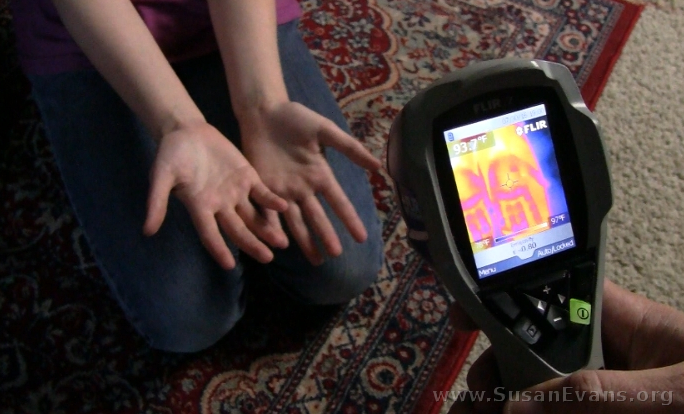
Next we will rub our hands together. You will see that the ring on my husband’s hand does not get hot, probably because the ring is tight on my husband’s hand, so the ring got no friction when he rubbed his hands together.

The grand finale is the vacuum cleaner. You will have to watch the video to see how the vacuum cleaner creates a line of heat in its path!

Heat & Friction Experiment: Infrared Camera (video)

This post contains affiliate links. I was compensated for my work in writing this post.

This experiment is from Christian Kids Explore Physics by Bright Ideas Press. We have been enjoying all the hands-on activities that bring the subject of physics to life for kids.

Coin Friction Experiment

Hold a coin against your cheek and see how cold it is. Now rub it against the carpet for 30 seconds. Low-pile carpet works better than shaggy carpet, by the way. Then place the coin against your cheek again and notice the difference in temperature of the coin.

Try different coins: penny, nickel, dime, and quarter. Rub harder or faster and see if the coin gets hot faster.

friction-coin-experiment

We measured the temperature of the coins before and after rubbing them against the carpet. We saw an immediate change in temperature, even to the carpet underneath it! We could sign our name in the carpet with the coin, leaving a hot trail on the carpet. This reminds me of signing my name with sparklers on New Year’s Eve.

friction-with-coins

Hand Friction Experiment

My daughter rubbed her hands together, and they got hotter. This is why if you are out in the snow and you are super cold, you can feel warmer when you rub your hands together, because the friction creates warmth.

hand-friction

I hope you enjoyed this fun heat and friction experiment. I had to laugh when I saw what my face looked like with the infrared camera!

Prisms, Light, and Color

Monday, September 19th, 2016

prisms-light-color

Today we will be learning about prisms, light, and color. We will be doing some hands-on activities to see what light is made of, and what it does. We will also learn why we see colors.

Light is electromagnetic energy. It has different wavelengths that fall on the electromagnetic spectrum. Light is made up of all the colors, as you can see when looking through a prism:

light-is-colorThis post contains affiliate links. I was compensated for my work in writing this post.

Light illumines the world around us so that we can see it. Light can be reflected, transmitted, or absorbed:

  • reflected: light bounces back
  • transmitted: light passes through material
  • absorbed: light sinks into an object

We conducted an experiment with several different materials and a flashlight, to see if the light was reflected, transmitted, or absorbed by the material. We used a mirror, Cling Wrap, wax paper, aluminum foil, a bench, and my jeans.

Experiments with Prisms, Light, & Color (video)

Take a look at how the prism separates white light into all the colors of the spectrum. Then watch as we conduct an experiment to see which materials reflect, transmit, and absorb light:

Playing with Colors

We printed a coloring page from Christian Kids Explore Physics by Bright Ideas Press, and my daughter enjoyed playing with colors as she painted the scene. She found out that when something is blue, that object reflects blue but absorbs all the other colors.

playing-with-colors

We had a wonderful time playing with prisms, light, and color!

Make Your Own Nest

Monday, March 21st, 2016

make-your-own-nest

When you are learning about birds in the spring, a fun activity you can do with your kids is to make your own nest. Your kids can “fly” around the yard as if they were birds, searching for materials from which to build their nest.

You want to start with a base, or a place to build your nest. You can grab one of those pottery dishes that go under a large potted plant. Or grab a tray from your kitchen. Or you can just build your nest on the ground or in a tree.

nest

Materials you can gather to make your own nest:

  • twigs and sticks
  • dead leaves
  • moss and lichen
  • wheat stalks
  • dead grass
  • bark from trees
  • dead weeds
  • fluff from flowers
  • wet mud

How to put together your nest:

You will want to mix some dirt and water to create your glue. Birds sometimes use spider webs or other sticky plants to keep their nest together instead of mud, but many birds use mud.

Start arranging your dry grass, leaves, pine needles, twigs and other debris into a nest shape. Use the mud to glue it all together. Make it nice and soft by adding moss and fluff to line the inside of the nest.

Now you can place some oval-shaped rocks into the nest to make it look like a bird laid eggs there.

More bird activities for a bird unit study:

I hope you enjoyed putting together your own nest. For more hands-on learning ideas, join the Unit Study Treasure Vault.

Skin Diagram Collage

Monday, February 15th, 2016

skin-diagram-collage

When studying the integumentary system, why not make a skin diagram collage? This art activity will help your students to remember the different parts of the human skin.

You will need the following materials:

  • a rectangle of black felt (or any other background color)
  • pink felt, yellow felt, and brown felt
  • red, blue, yellow, and white yarn
  • black pipe cleaner
  • white school glue
  • hot glue gun

How to Assemble a Skin Diagram Collage

  1. Set the black felt rectangle on the table in front of you. This is the background of your skin diagram.
  2. Cut an onion bulb out of the brown felt. See diagram for shape. This is the hair follicle.
  3. Cut small circles from the yellow felt. This represents the fatty lipids in the hypodermis, which is not actually a part of the skin. The hypodermis lies under the dermis.
  4. Cut out the epidermis (the top layer of skin) from the pink felt, to make it look like icing on a cake. Glue it down.
  5. Glue down all your other felt figures with white school glue.
  6. Make a sweat gland by wadding up some yellow yarn into a blob of spaghetti. Glue it down, with the yarn going up to the epidermis.
  7. The red and blue yarn are veins and arteries. If you make a shape with glue, then you can shove the yarn into the glue. Distribute the veins and arteries evenly, along with the white yarn nerves. They should look like plant roots.
  8. Hot glue a black pipe cleaner to the brown hair follicle. This represents the human hair, which grows from the bottom of the follicle.

Now your skin diagram collage is complete. Enjoy your masterpiece.